What an unproductive summer on the DIY/Blogging front over here. As I stare at my list of projects and plans from May it's impossible not to feel a bit disappointed at how little I accomplished. That's not to say I wasn't busy this summer - it flew by again, just like every other one before it. However it's never fun to look back at all that could have been completed and know that you will never get the time back.
I supposed the list will have to wait for next May and I can take comfort in the fact that nothing on it was important enough to require a timeline - no, "reverse global warming" didn't make the cut this year. In the meantime, I am off to Europe with my boyfriend until early 2014, where I can all but guarantee I won't have any DIY projects to share.
If you get the itch and can't wait until I'm back for a new DIY project, may I suggest checking out a few of my most popular posts from the spring? My stenciled Aztec Tote is right on trend for fall, while my Vintage Book E-Reader Case can be completed in under an hour. If time in the kitchen is more your style, it's hard to go wrong with a blackberry-lemon flavour combination!
Until the projects begin flowing again next year, you can always pop by and say hello on my travel blog haveblogwilltravel.org
Thanks for following along and have a wonderful 2013!
Calli
Tuesday, August 27, 2013
Monday, June 10, 2013
Writer's Block
On this sunny Monday morning I find myself with the day off from work and very little crowding my to-do list. After a shower and a few minutes distraction provided by various morning news programs on television, a little voice in my head begins nagging at me to write. It's been a month since my last post, and although I've accumulated some new muffin recipes worth sharing, and could brag about the successes of my first attempt at growing a vegetables garden (the lettuce is ready to eat already!), I just can't bring myself to do the work. Getting the words down, while making smart and cool pop-culture references and funny quips, bringing the piece together in a neatly tied package, is daunting to me today - a feeling that's been growing over the last month.
It's not that I haven't been writing, on our Travel Blog my boyfriend and I recently put out a four week series detailing every aspect of our budgeting process, and announced another long-term trip we will be embarking on this fall. However those pieces border on clinical, a far cry from the fun or funny. While I struggle to get words, any words, down in blog form, I can't help but think back to the fall, when we explored Europe's winding streets and ancient sites by day and wrote about them, at length, by night - every night. Exhausted from walking all day, we somehow managed to write, edit photos, and keep up with social media, on a daily basis.
Now home, with excess time on our hands and an array of comfortable locales from which to settle in and write, the words have dissipated and I find myself perched in front of the computer staring at an empty screen, unable to string together anything worth sharing. Perhaps the issue is not one of time or accessibility, but a lack of inspiration. Without that burning desire to share what I've been up to in the kitchen, or pride in a recent DIY project, the words have dried up.
The passion will return, this isn't my first dry spell and will unlikely be my last, however there is something truly frustrating about losing the desire the moment you give it your full attention. While working part-time this summer, I have the rare opportunity to spend copious amounts of time doing what I love, and instead I find myself parked in front of Breakfast Television, cringing at the awkward interviews.
While I work to find my way back to writing, here's some wonderful Monday Morning inspiration to start the week off right, courtesy of my Pinterest addiction...
 |
| Spring blooms in colourful glass bottles (via) |
 |
| Mix and match patterned pillows for the perfect outdoor seating (via) |
 |
| Buttery and soft sugar cookie sandwiches on charming china (via) |
 |
| White on white with hints of blue (via) |
 |
| Poolside hit of pink (via) |
Tuesday, May 7, 2013
Sweet and Easy Strawberry Tart
 |
| A big wedge of tart with a scoop of frozen yoghurt |
Sometimes, in the chaos of the work week, dessert becomes a necessity. Hailing from a long line of dessert fans, both my grandfathers are guilty of overusing the phrase "one of each", dessert is always welcome, mid-week or not, however I often don't have the time to make something during the week, much to the relief of my waistline.
However I may have just created something out of control, forever wreaking havoc on both the space time continuum and my favorite skinny jeans. As though I could accomplish two things at once, dessert accompanied dinner tonight, without any juggling of my schedule, with this super easy, incredibly fast, and wonderfully fresh tasting Strawberry Tart.
And yes, I watched Fringe on FOX and now think I fully understand the field of Physics including the theories of time travel.
This tart is not only fast and simple to make, it also requires only three ingredients - puff pastry, strawberries, and sugar - and, after realizing how amazing it is, I plan to keep puff pastry in my freezer on an ongoing basis, meaning I can easily whip this tart up whenever I want, using whatever fruit I have on hand (peach raspberry first popped to mind but there are plenty of options).
 |
| Looks tasty doesn't it? |
To make your very own Strawberry Tart simply...
1. Lay one piece of the pastry out on a buttered baking tray and set your oven to 350 degrees.
2. Wash your strawberries and slice, about a cup and a half, then arrange on the pastry leaving a half inch border. Sprinkle with one teaspoon of sugar.
3. Bake for 15-20 minutes or until the pastry is golden brown and the berries are tender and their juices begin to seep out
4. Cool and top with whipping cream or vanilla ice cream or frozen yoghurt (our personal favorite)
 |
| The tart, fresh from the oven |
Recipe Synopsis:
Taste: Fresh and not too sweet, the berry taste comes through and works well with the whipped or ice cream.
Texture: Juicy berries and light, fluffy pastry
Wow Factor: The prettiest dessert I've ever assembled in five minutes
Difficulty: Wonderfully easy
Serve With: Whipped or ice cream, it's wonderfully light making it perfect for hot summer days
I actually found this recipe a year ago and somehow my plans to make it have continuously been delayed. You can find the original version at PopSugar.
Note: my berries didn't let off as much juice as those in the original photo, so on my second attempt I let them sit with some sugar in a bowl after being sliced, then poured the juices over the arranged slices before popping it in the oven.
Yes, I made two - when the puff pastry comes in two packs what's a girl to do?
Monday, April 29, 2013
Cranberry Scones for Breakfast
I fell back on an oldie but a goodie this morning, as I whipped up a batch of Cranberry Scones to accompany my morning tea.

I return to this recipe time and time again, as these scones always turn out wonderfully, however this morning when I decided to make some on a whim I realized I didn't have any half and half - it's not something I normally keep in the house. Before panicking, I decided to substitute yoghurt for the cream, however upon opening my container of Greek yoghurt I realized it had gone bad.
It must be Monday morning.
Unwilling to abandon my desire for fresh Cranberry scones I turned to the internet, and although the options were lacking, I decided to chance the recipe using some some sour cream.
Luckily the scones turned out as wonderful as always, and now that I know they can be so delicious without half and half I am unlikely to go back - it will be only healthier Greek yoghurt or sour cream moving forward!
 |
| The scones, heading into the oven |
 |
| Fresh and juicy from the oven and ready to be devoured |
I've shared the recipe before, in it's original context, (adapted from Martha Stewart), however here is my revised recipe using sour cream...
Ingredients:
2 cups flour
5 tablespoons sugar
1 tablespoon baking powder
1/2 teaspoon salt
6 tablespoons chilled butter
2/3 cup sour cream
1 tablespoon milk
2/3 cup frozen cranberries
Process:
Combine the dry ingredients and then cut in the chilled butter using a pastry blender. Add the sour cream and milk and stir to combine. Add the frozen cranberries. You may want to use your hands at this point as it can be hard to get
the dough to form a ball, however be careful not to overwork the dough
as it will make your scones tough. As these scones are quite rustic,
don't worry about making every little bit of flour come together. Move the dough onto the counter and work into a disc shape, about 1/2 and inch thick - again these are meant to be rustic. Slice into wedges and place on a greased baking sheet. Bake at 425 degrees for 12-15 minutes or until the bottoms begin to brown. Let cool slightly before consuming.
Recipe Synopsis:
Taste: The scone is light, not too sweet, and the cranberries add a lovely juicy tartness.
Texture: Flaky pastry and plump juicy cranberries.
Wow Factor: Although intended to look rustic, the scones are still quite lovely and would make a wonderful gift
Difficulty: Quite simple and fast, the recipe only requires one bowl. The most difficult part is bringing the dough together and not trying to make everything perfect.
Serve With: A hot cup of tea or coffee for breakfast, or tuck into a lunch bag for a morning snack.
Friday, April 26, 2013
Ending up on Etsy
Perusing the internet on a Friday evening, waiting for my boyfriend to get home so we can eat dinner, I stumbled over to Poppytalk, a wonderful Canadian design blog if you haven't yet had the pleasure, only to read about an exciting Etsy and West Elm pop-up shop hitting Vancouver later this month.
With Vancouver only a few short hours away I had to check it out, which led me to the individual Etsy sites for each vendor participating... an hour of browsing beautiful things later and my Christmas shopping is complete, or might as well be.
Sometimes I find Etsy a little bit intimidating, there are so many vendors and so many products that one search pulls up hundreds of pages of results. It's very simple to be sucked in, only to surface hours later unsure of what just happened. Therefore I love to read up on other people's favorite sellers, and to hear that they are getting together in Vancouver is just too exciting!
Here are a few of my favorite item's from the featured sellers, you can find the entire list on Poppytalk here, as well as all the event information.
 |
| These cufflinks are made from bamboo. I love the little teepee tents! (by Cabin) |
 |
| Can you believe this is a soother clip, perfect for the preppiest of babies. (by DownHomeAmy) |
 |
| A gorgeous Merlot Sea Salt that has my mouth watering with sweet and salty flavour ideas (by The Pink Peppercorn) |
 |
| Every Vancouverite needs their own set of jealousy inflicting chopsticks (by StorieBrooke) |
Unfortunately, even being so close, it doesn't look like I'll be able to sneak down for the weekend. However if anyone lives in the area and decides to go please feel free to gloat away, I will live through you vicariously.
Tuesday, April 23, 2013
Tutorial - DIY Aztec Print Tote Bag

It appears Aztec and Navajo prints are going to stick around for awhile - which is plenty fine by me, I love their sharp geometrical angles, especially when paired with bright punchy colours.
As the trend continues to grow, moving from fashion to home goods, accessories, and even manicures, I decided it was time I had a little Aztec in my life. I decided to incorporate the print into a DIY project, preferring to stay away from the shops to save my pennies for travel, utilizing a stencil to keep the edges crisp and straight.
To make one of your very own, here are the materials you'll need:
- Transparent paper (to make the stencil)
- Thin tip permanent marker
- Exacto knife
- Any pattern, print, or silhouette
- Scotch tape
- Acrylic paint
- Sponge paint brushes
- Canvas tote bag
- Cardboard
- Plastic plate
To start, we need to make the stencil for our pattern. Although I chose to go with an Aztec print, the options really are endless and I've got a few more ideas in the works that I hope to try soon. I found a print I liked online and printed it out, scaled to fit on an 8x11 piece of paper. With some decent ruler skills you could also draw up your own pattern on some grid paper.
 | |||
| Stencil materials - I used a pop flat to cut on but a cutting mat would be much better |
 |
| The transparent folders I bought from Staples called Poly Project Pockets worked great |
Taking the pattern, attach it to your transparent paper and trace over the pattern with your marker. I found transparent folders that had a good thickness - thin enough to cut through but thick enough to hold up - a five pack was on sale for $6, and I was able to cut them open, doubling what I have to work with (cutting my cost/stencil to 0.60 cents) .
 |
| The transparent paper after tracing my pattern |
 |
| Cutting open the folder |
Once the pattern is transferred, remove the original paper copy and then, working on a piece of cardboard to protect your table, carefully cut out the pattern using your exacto knife.
 |
| Cutting out the pattern is tedious but you want to do a good job to ensure you get a quality stencil |
Now that the stencil is created, we can move onto painting - the fun part!
Slide a piece of cardboard into the tote bag to prevent any paint from bleeding through and place a small amount of paint onto the plastic plate. Layout your stencil and secure it to the canvas with the Scotch tape.
My canvas tote bag was a bit wrinkled so I ironed it first to ensure it would lay flat.
 |
| Lay out the stencil and secure it with tape |
Using one colour at a time, apply the paint with the sponge brush in a dabbing motion. To avoid bleeding, keep the brush vertical, dabbing up and down, and only apply a small amount of paint to the brush at one time.
I
found it was also helpful to tape off the sections of the stencil I
didn't want to paint - because my stencil was more on the intricate side
with small gaps between the shapes, I didn't want to accidentally
"spill" paint over the edges of the stencil.
 |
| You can see the tape covering sections of the stencil to avoid accidents |
 |
| Apply the paint one colour at a time, letting it dry in between |
Between colours it's a good idea to allow the paint to dry for 5-10 minutes - remove the stencil to avoid any smudging.
Once the pattern is complete let the entire bag dry overnight before putting it to use. As far as cleanup is concerned, it was a breeze. I simply peeled the tape off the stencil and wiped it down with a damp paper towel so I can use it again and washed out my foam brushes.
 |
| Once the painting is done remove the stencil and let it dry |
 |
| I tried to think ahead when applying the paint to avoid having too much of one colour in a single area |
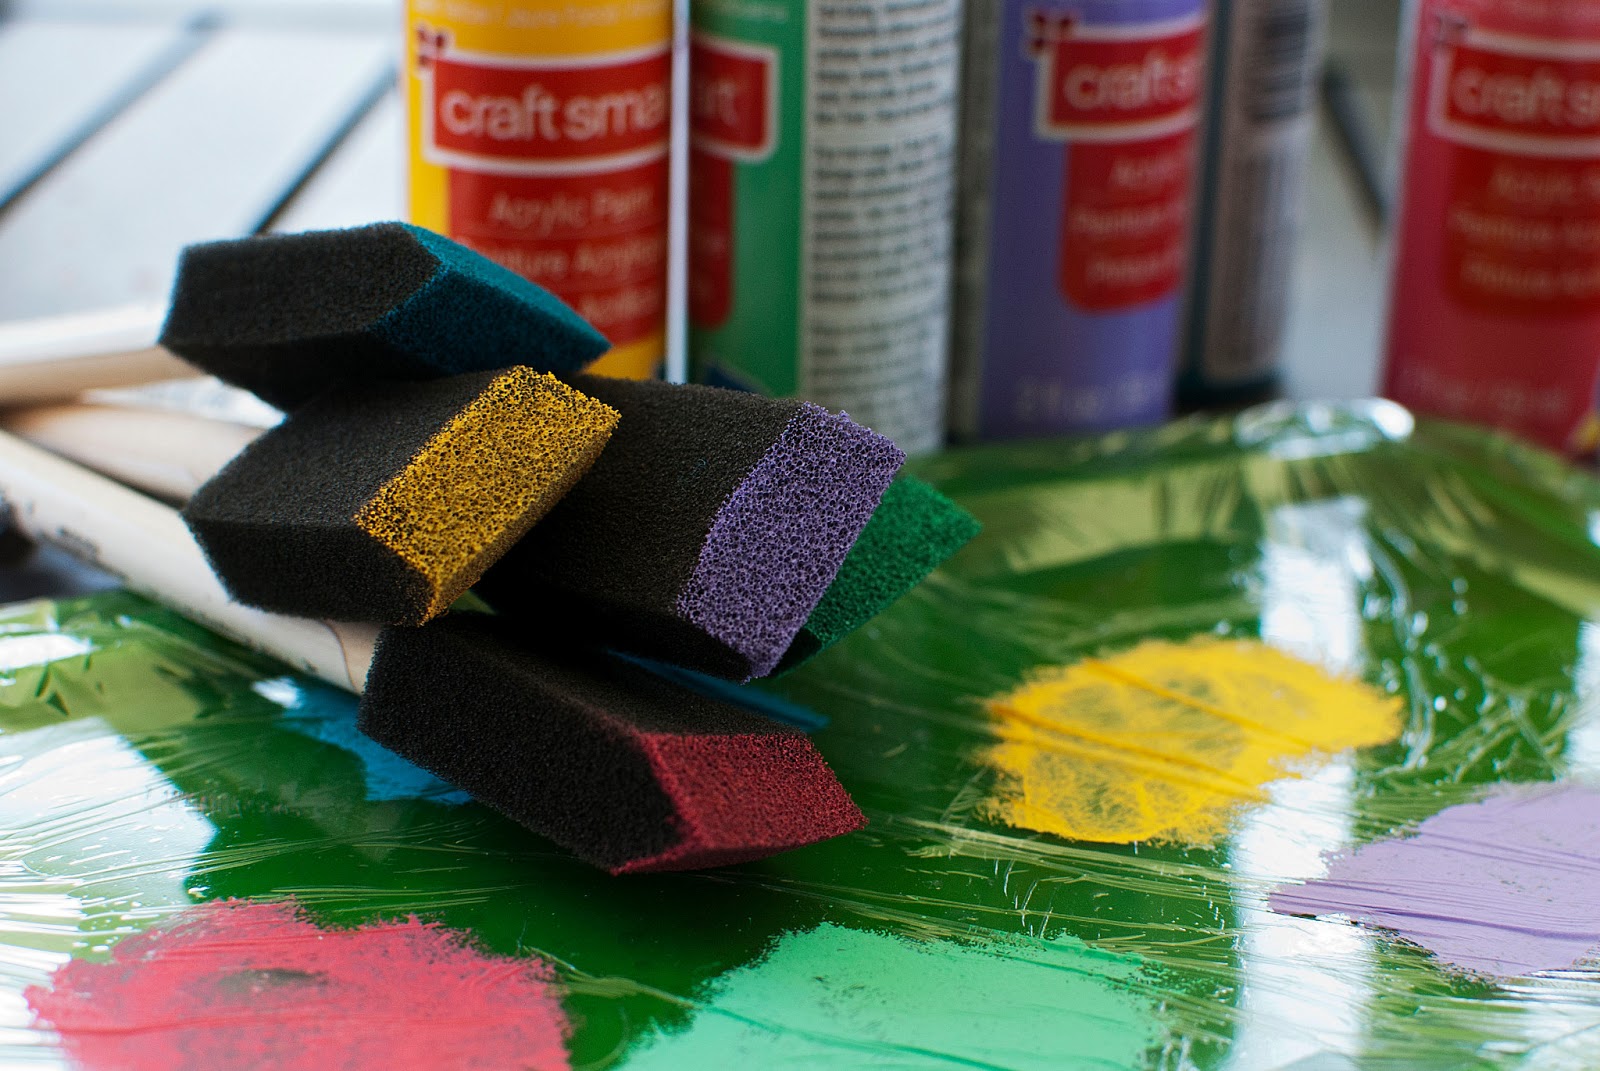 |
| This craft smart paint is from Michaels - I used Dark Yellow, Spearmint, Turquoise, Grape Taffy, and Hot Pink |
I'm extremely happy with how my tote bag turned out, the colours are perfect for summer and the lines are quite crisp with very little bleeding. The project took about 6 hours total, which depends significantly on the complexity of your stencil. Initially I thought this tote would be the perfect size to hold my knitting projects; however, now I think it's too cute to keep stored away at home.
 |
| The finished product! |
Psst! I'm sharing this project over at...
Skip to my Lou
Today's Creative Blog
Domestically Speaking
Seven Thirty Three
DIY Inspiration - Aztec and Navajo Prints
Aztec is not only one of the hottest trends right now, it's also the inspiration for my latest DIY project. Although we saw an array of glorious chunky aztec print sweaters this winter, the pattern is now dominating fashion as well as interior design and the vast world of accessories - it's even found it's way onto my little blog as a little something extra to spice up the header.
THE INSPIRATION
 |
| Add a crisp blazer for a polished look (via) |
 |
| Patterned sunglasses to match your manicure (via) |
 |
| A cute detail on these two toned oxfords (via) |
 |
| A fun printed quilt in primary colours (via) |
 |
| An relaxed tunic in blacks and browns (via) |
 |
| Some Aztec inspired bling (via) |
 |
| A delicate clutch gets a punch of neon pink (via) |
 |
| A pretty little throw pillow in bright hues (via) |
MY CREATION
Taking in all this inspiration, I decided to make an Aztec print tote, using a handmade stencil I whipped up from items at my local office supply store. I'll share the tutorial tomorrow!
Subscribe to:
Posts (Atom)