Friday, April 29, 2011

A Bit of Brilliance - You Made My Day

I only had three days of work this week because I used some vacation time to make last weekend extra long... sorry to rub it in, I guess my brilliant 5 day weekend is getting a little old eh? As if a short work week wasn't great enough, here are a few things that made it even better!

1. On my first day back I was lucky enough to have a work luncheon at the beautiful, world renowned,  Tobiano Golf Course. Not only was the view spectacular but the meal was delicious too!


Photos via Contemporist
Although lunch was amazing all on its own I got flowers too! (It was administrative professionals day or week or something) Sorry for a lack of pictures but they are at the office where I am thoroughly enjoying them!


2. I ordered fabric for my cane chairs... Need I say more? A couple of my faves were sold out so I had to improvise and you will have to wait and see what I finally settled on but here's a teaser...

Fabric.com

3. Can we talk for a second about just how wonderful this vintage flash card art is? And how wonderfully creative are the phrases? L.O.V.E it!

By Sundance (sadly no longer available) via Design*Sponge

4. I will admit there were moments where I too doubted the Canucks but Burrows restored my faith (and won back a place in my heart after taking a penalty in OT). The game was one of the more exciting things I've seen lately and I'm pumped for this series against Nashville!


Our local farmer's market has finally kicked off for another season! This means bedding plants, fresh veggies, baking, and eventually fresh berries! I thinks I might head down there and check it out if the weather co-operates. Besides that, most of my time will be spent playing soccer - hope your weekend is fabulous too!


Enjoy!
Calli

Thursday, April 28, 2011

Project Cane Chair - Demolition

I know what you are thinking - Calli, you had a five day weekend, surely you accomplished more than just painting your bathroom?

Naturally, with five days off, I had a list in my head of a million things I wanted to accomplish and I barely made a dent. Isn't it amazing how quickly vacation time flies by? I was able to catch a couple Easter dinners and sleep in late a few days before Tuesday popped up and I realized that I was headed back to work the next day. 

In between the first and second coats of paint I escaped the fumes in the bathroom to start work on my cane chairs (finally!). Before I can buy great fabric and start the upholstery I need to remove the old fabric and paint them so that's just what I did.

A little warning, other people's dirt really gives me the heebie-jeebies,  and these chairs were in bad shape. I used my steamer on the cushions to try and get rid of the smell of cigarettes but there was also a wad of gum under one arm and all kinds of remnants between the cushions - I was not impressed. 


The upholstery consists of three pieces. First, I removed the seat (there are normally screws on the underside that attach it to the frame) and set it aside to wait for some great fabric. 


The back consists of two pieces (the front and back of the back? It is confusing I appologize.) I had to remove the cording that edged the back piece first so I could access the staples that hold the fabric in place. This was a great excuse to get a little angry. 


After the cording was removed and the staples revealed I used a small flat blade screwdriver and a pair of needle nose pliers to rip out each staple. Unfortunately the wood is a little soft and the prying motion of the screwdriver to lift the staples made a few little indentations but I am sure I can cover them up with a little light sanding. 

After I removed most of the staples (some just wouldn't budge) and the front piece of back fabric I took out the foam padding (which will most likely be replaced with something a little more plush) and kept it aside as a pattern. Normally I would keep the fabric as a pattern for the new upholstery but it was gross and I wanted it gone pronto. 


After the foam and front piece of back fabric were gone I could access the back piece of fabric. This is the piece that shows from the backside of the chair (that I plant to do in a second complementary fabric). Again I pried out the staples, as many as possible, and got rid of that nasty fabric.


Now my chairs (well one at least) sit bare. Next, I am going to make some minor repairs to the caning, give them a light sand and dusting, and then coat them with fresh new white paint.

Enjoy!
Calli

Wednesday, April 27, 2011

From Beast to Beauty - Master Bath Part II

Bare, clean, walls? Check. Patched and sanded holes? Check. Paint cut in around ceiling, baseboards, fixtures, and corners? Check. I was ready to roll.

Overall I find the entire painting process therapeutic - I've got my music playing and I can let my mind wander... This is especially true if I've done a good job cutting in because I don't need to get too close to the ceiling, trim, or fixtures when rolling and can avoid any scary moments (usually when I end up swearing like a sailor).

I'm no expert (trial and error baby!) but my main tip for rolling on paint is to avoid getting too much paint on your roller - you want light coats, no drips, and if you overload the roller with paint it can splatter all over the place. Also, I like to go in a W pattern, rolling back over the area to eliminate any paint lines (like colouring a picture with concentric circles).

Painting my master bathroom posed a few challenges. Reaching over top of the shower was tough because my ladder wouldn't fit inside it - this was overcome with a lot of reaching and teetering. Toilets are also a pain in the butt to paint around in general. Being right handed I prefer a certain angle when cutting in, which the positioning of my toilet did not accommodate. However after some contortionist style maneuvering I was able to get paint everywhere (including where I originally wanted it).

A small mistake easily rectified with some white trim paint.
I used a large roller as well as a smaller one for some of the tighter areas and I think that this worked out really well. The smaller roller allowed me to avoid getting paint all over the toilet, base boards and myself while painting in the tight corners.

I stretched this project out over 3 days because a) It was Easter b) I had the time and c) I like to give as much drying time as possible. Any lovely lady out there (or guy - no judgment) who has applied a second coat of nail polish too soon knows the value in letting something dry.

Progress - paint coat numero uno
This paint went on nicely and the colour covered really well. I've found that darker colours often require multiple coats (aka my high maintenance 4 coat bedroom feature wall) but was pleasantly surprised this time and only ended up with 2 coats.

I mentioned my need for perfection so I cut in again on the second coat. However I didn't go as slow or try to get as close to the ceiling/baseboard/fixtures as the first time. I then rolled on my second coat and stood back to admire my handiwork. The second coat took a fraction of the time and that's why it is so important to take your time with that first coat. If I had rushed through cutting initially I would have had to spend a lot of time fixing mistakes.


The only thing left to do was the baseboards. I had freshened up the door and door frame with new white paint when I did my bedroom so this time I only needed to do the baseboard trim inside the bathroom. I also touched up a couple mistakes from the rolling process. 

I really have a thing for turquoise and red so that's the direction I'm heading. Clearly the room isn't done quite yet, but with some art, a towel bar, and a sprinkling of a little bit more red...

Enjoy!
Calli

Tuesday, April 26, 2011

From Beast to Beauty - Master Bath Part I

I took a couple days off work to make this Easter long weekend ever longer - and used that time to put a decent dent in my to-do list.

The major project this weekend was my master bathroom - the one that hadn`t been touched in a year (since I first moved in) and had a failed test of blue paint on one wall? Yea that one...

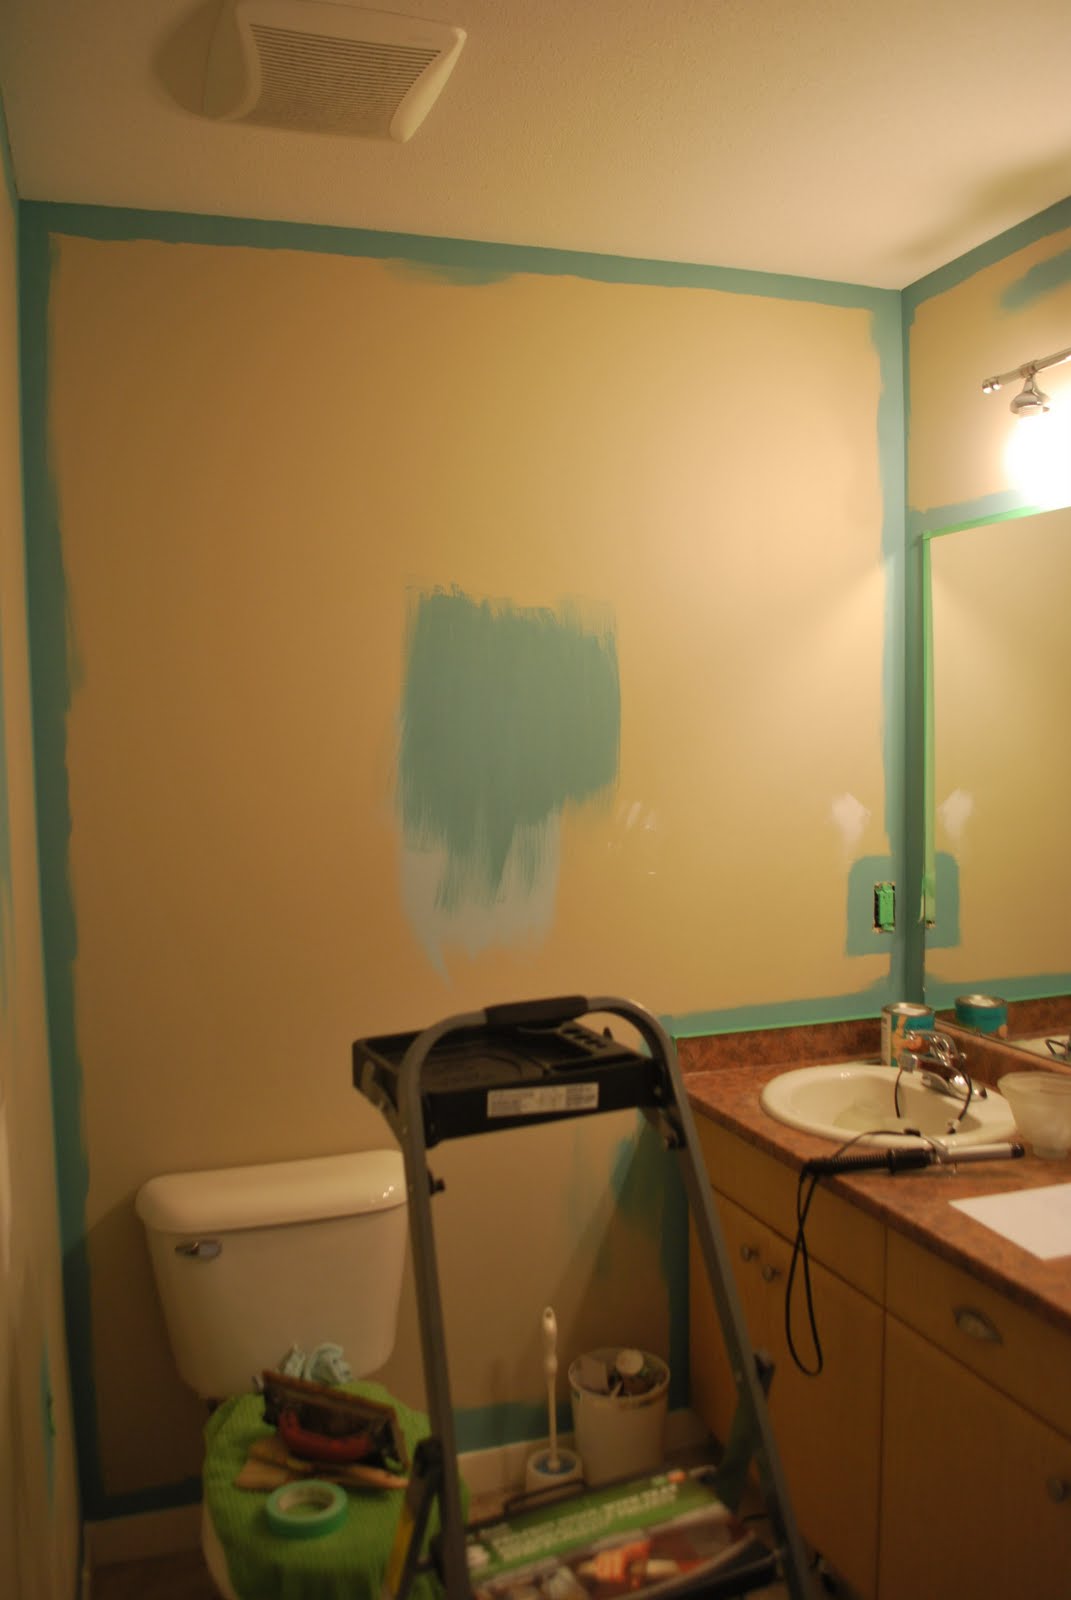
Here's the before - I'm a bit embarrassed


When I moved in the entire house was this beige colour. Now there isn't anything wrong with beige, if that's your thing, and I know plenty of beige lovers out there so I wont criticize. Beige however is NOT my thing and I tend to cringe at anything labeled "earth tone" because it just seems to be everywhere. Perhaps I'm trying to be a bit of a rebel...

So out with the beige! And in with some blue?  The first step was choosing the right paint colour. I knew that I wanted a blue but with so many different hues and shades I was worried it would come out too country or worse - stereotypical. The colour I finally landed on is call Direct Appeal by General Paint. It's a green-blue with a lot of white in it. I did a couple test patches on the wall and then decided to just jump in and commit.

You can see the failed light blue under the new blue
Whenever I get home with a fresh new gallon of perfect paint I want to dive right into painting. However there are some super important steps that you really can't skip before applying the paint. In my case the walls were clean and free of any residue and I dusted the baseboards to avoid any little bits sticking to my walls.

When starting a project I try to gather all my materials first - I know that I'll only get angry if I have to run around mid-project looking for something. Here's what I used:
  • step ladder
  • paint
  • paint tray
  • my favorite paint brush for cutting in
  • paint roller
  • painters tape
  • drywall filler
  • trowel
  • sander and sand paper
  • flat blade screwdriver
  • damp cloth
  • garbage bag
  • drop cloth
After a good clean, I prepped the walls. I am moving an old towel bar so I had to remove the hardware and patch the holes left in its wake. I'd only ever seen my Dad patch drywall before but these holes were very small so I decided to give it a try.


It is actually quite simple to apply the filler with a trowel and then, after it dries, simply sand it smooth. Also I love projects that make me feel handy without needing a lot of skill. I was so proud to have patched the holes all by myself! There are some great tutorials online if this is something you are thinking of tackling.

While the filler dried I removed all the electrical plates and put them in a bucket with the screws so nothing went missing. I also removed the glass covers on my light fixture. I ended up with only one minor burn from a hot light bulb so I'm counting this a success*. Having bare bulbs in the fixture alleviates a lot of headaches - it makes it easier to paint around the fixture and if a bit of paint gets on the bulb it's not biggie (especially compared to paint on the glass fixture itself).

*It's tricky because you need the lights on to do all the other work but then have to turn them off to remove the glass covers by which time everything is hot.

After my walls were prepped I threw down my drop cloth and got to work cutting in. I have a love-hate relationship with this part of painting and as a perfectionist I am never truly happy with the end result. However practice makes perfect (I've been told) so I'm gonna keep doing it... maybe after I'm done the entire house and have no more painting projects I'll finally get the hang of it.


I think that the trick with cutting in is the brush. I have my favorite go to brush and I'm honestly afraid to replace it. The other part of cutting in is patience - it is a long slow process but do it right once and it saves a ton of time later on.

Clearly this was a long process - Come back tomorrow for the big reveal!

Enjoy!
Calli

Monday, April 25, 2011

Spring 101

Spring is here! I know the first official day of spring was over a month ago but it hasn't really truly feel like spring( for an entire day) until this past weekend. In fact, this is what I woke up to just last week.


But that's all over now (no I am not going to jinx it) and to help things move along here are some surefire ways to make the inside of you home feel spring-like (even if mother nature isn't helping).

Bring on the Colour
I like the idea of switching up a few accessories here and there to transition from winter to spring. Watercolour inspired accessories are everywhere and add a great burst of fun, cheerful, springtime colour.
Paint Palette Pillow - CB2

Watercolor Duvet - Urban Outfitters
Get your Grow On
Plants instantly make a home feel alive and fresh. Now is a great time to get indoor and outdoor plants as most of the stores are stocking up as well as local farmers markets. Planters and pots also offer a great excuse to be creative or introduce more colour! My plant related goal this spring is to start a herb garden for my deck. 

Look what I picked up this weekend

Freshen Up
One of my favorite things about spring is the chance to (finally) open the windows and air out the house. Mix in a little spring cleaning and soon everything feels fresh, clean, and new. I am planning a major reorganization and purge of my garage in the coming weeks - I'd love to set up a craft area.


I am so excited because the warmer weather also means that I can start working outside on some of the projects I've been storing up. 

What are you doing now that spring is finally here?

Enjoy!
Calli

Friday, April 22, 2011

A Bit of Brilliance - Oh so Romantic!

Apparently sea-foam can be romantic! Who knew? The intricate details in the staircase are glorious as well as that soft filtered light streaming through the huge window!

House of Design & Style

Talk about sexy! If I were Cinderella I would ask my fairy godmother for these - Goodbye glass slipper, Hello Valentino! (For $4500 a pair I really will need a fairy godmother)


I love Spring and all the potential it offers... my favorite thing about this fabulous season are the budding flowers. Could there be anything more romantic than fresh flowers?

Adenium obesum  - Desert Rose (by me)

Like something out of the Great Gatsby this dinner party is equal parts glamor, extravagance, and whimsy - doesn't black and white photography just make everything more romantic?

Source Unknown

Oh so swoon worthy... I could lose a weekend (or two) in this bedroom and not even notice.

La Maison Boheme

Enjoy!
Calli


FYI - My regular Friday 'Quick and Dirty Posts' are now 'A Bit of Brilliance' - each Friday you can check out the Brilliant finds that I've spotted online and around town during the week!

Thursday, April 21, 2011

What the hey is Pinterest?

While exploring pictures online, I found myself constantly ending up on this site called Pinterest. So then I started wondering what the hey is Pinterest?

It just so happens that "Pinterest is a place to catalog the things you love"

Turns out that a) I love things and b) I love being organized

Some quick detective work (aka reading their "about" page) and I found this...

Think of Pinterest as a virtual pinboard — a place where you can create collections of things you love and "follow" collections created by people with great taste. 

People use Pinterest to share all sorts of things - You name it, people are pinning it.

We know you have great taste in something. Our mission is to make Pinterest the best place for you to share your taste with the world.

I don't know about you but I find this so exciting! Think of the possibilities for sharing inspiration online! Last night, after only about 5 minutes of exploring the site I was hooked... and the next few hours flew by...

The best part? The lovely people at Pinterest also have a great bookmark that grabs an image from any website, adds it to one of your pinboards, and automatically grabs the source link so the original creator can get the proper credit. 

*I try really hard to give credit where credit is due but sometimes still forget where I found something.

The pinboards are grouped by category - a quick click on the home and furniture tab gets me to this...


I've added my name to their waiting list and have received a charming email promising to get me pinning soon! It all sounds very exclusive and you can bet your bottom dollar that as soon as I start pinning I'll start sharing more on here.

So go along now, see for yourself... http://pinterest.com/

Enjoy!
Calli

Wednesday, April 20, 2011

Lady Gaga + Crazy Outfits = Sleek Sexy Rooms?

Last weekend while having some drinks with the girls the conversation turned to Lady Gaga. I am definitely a fan - her music is so catchy and original (except for 'Born this Way' which is very Madonna-ish). I will admit that she is a little different - ok maybe a lot different - but hey, whatever floats you boat!

Although she has been 'on the scene' for a few years now, Lady Gaga's outfits continue to surprise. There was a meat dress, a hair dress, and a Hello Kitty dress, to mention a few memorable ensembles. Most of the chatter around Lady Gaga seems to focus on a) how outrageous she is and b) the impact and influence she has on fashion trends. 

A trend is a trend my friend so it was easy to pair pictures to show the link between Lady Gaga, fashion, and interior decor...
Red Bathroom via theluxhome.com
Turquoise and Zebra Bedroom via Decor Pad
Grey and Dusty Rose Office via Decor Pad
Black Bedroom
Purple and Yellow Office via Decor Pad
My favorite thing about these pairs I've put together is that they show how sleek, modern, and sexy a room can be even if the inspiration is 'out there'. You wouldn't catch me in any of these outfits but I would live in any of the rooms!

Maybe I'll try using this Lady Gaga hair style as inspiration for my second bedroom? I'm picturing soft mauve walls, crisp white bedding, and soft net suspended over the bed.


One trend I can't really see catching on or transferring into my house - face implants. What was she thinking???

Enjoy!
Calli

Tuesday, April 19, 2011

P-P-Problems Posting

Obviously by the title I'm still not really over yesterday's Lady Gaga themed post - and fun fact, Poker Face is my favorite Gaga song...

But let's get down to business. A few people have mentioned that they have had trouble posting comments. This of course I don't want - I LOVE your comments and want to encourage them so any sort of difficulties make me a tad cranky.

If this is only a tad cranky...
As an expert problem solver I did a little fact finding to see just what the problem is and guess what? Every person's issues seemed to be centered around this lovely little box...


So many problems from such a little box... So here's the way around this issue if, by chance, you happen to feel the urge to comment!

First, write your brilliant, insightful, kind, funny comment OR give some constructive feedback OR share some ideas about posts or content or whatever you feel like!

Second, from 'that' box [comment as] select anonymous - unless you have a google account or one of the other options to use

Third, select [post comment], cross your fingers, and wait for what seems like forever to see if it works!

*Note - if you post under anonymous and don`t mind adding your name in your post please do - I always like knowing who you are - but if not by all means don`t stop and post in secret!

That should be it, post away my dears - I really do love getting your input and opinions!

Enjoy!
Calli

Monday, April 18, 2011

Fabric Choices and Choices and Choices

I am not very good at making decisions. Oddly enough the decisions that give me the most trouble could be classified as 'fun and easy'. Give me a tough situation and I can muster up some pro/con lists, cry a little, and get it done - but ask me where I want to go for dinner and we might starve to death.

As a result of putting off some of these 'fun and easy' decisions my little house is stuck in a rut. Among the poor suffering rooms and projects are these lovely little cane chairs.


I must say my little cane chairs have been extremely patient with me - they've been sitting in the garage for months without any complaints, while I try to make some decisions about how they should look. I really want to use some fun and punchy fabric but have been unable to find anything locally that I like - now I'm taking this task to the internet.

Unfortunately, although brilliant, the internet has provided me with an overwhelming amount of options but not an unlimited budget. Here are the few I've narrowed it down to - for now...

All from Fabric.com

Waverly Parterre - Grass $15.98 per yard
Ty Pennington Home Decor Impressions - Honeycomb Gray $16.99 per yard
Premier Prints ZigZag - Chartreuse/White $6.98 per yard

Premier Prints Butterfly - True Turquoise $6.98 per yard
Premier Prints Suzani Slub Texture - Yellow/White $6.98 per yard
Premier Prints Ozborne - True Turquoise $6.98 per yard

Waverly Small Talk - Azalea $13.98 per yard
Waverly Ellis - Flamingo $8.98 per yard
Premier Prints Traditions - True Turquoise $6.98 per yard

I am leaning towards using two coordinating fabrics per chair - one fabric for the front and seat and a second fabric for the back. The chairs don't necessarily have to match, I'm not really a matchy kind of girl, so I can potentially buy 4 different fabrics (the more the merrier!)

If my math is correct (and it very well may not be) I think I'll need one yard of fabric for each front and a half yard for each back. Even when I factor in shipping costs, the price is comparable to anything available in town and the selection is sooooo much better!

Here are a few pairs that I am looking at:


Any opinions out there? Please share! What would you choose?

Enjoy!
Calli

Friday, April 15, 2011

A Bit of Brilliance - Random Ramblings

Oh how excited I got when I spotted this little gem on the fabulous Parlour home blog! Notice anything that looks familiar? No? Look for a clue over here... Why yes, how observant of you, that IS the same gorgeous mirror that adorns my entrance...

Caitlin Creer Interiors via Parlour

I am loving this colour combination right now - as inspiration for a room or outfit if not a wedding.
The Inspired Bride via Style Me Pretty


A gorgeous and delicious dinner with Outstanding In The Field holds a top spot on my bucket list. The pictures alone make me want to scoop up tickets... alas I need to save up a bit first.


At lunch the other day a very lovely friend asked if I was going to feature any Easter decorating or DIY projects on Strawberry Roan. Although I probably wont be taking on many Easter inspired projects here is a little inspiration...

Courtesy of Fine Things and Big Dreams
Via That's So Cuegly
Classic Martha Stewart
Even without Easter projects I will be indulging in my absolute favorite part of Easter - Cadbury Mini Eggs! (Yes I know they are available all year but doesn't the waiting make it better?)

Any Easter projects or decorations to share? I'd love to see 'em!

Enjoy!
Calli